Filmsio

An AR app that provides support to filmmakers for quick scene iteration, character blocking, and storyboarding.

Client

Self - Initiated

Role

Product Research
UX UI Design
Development

Timeframe

3 months

A Problem in the World of Indie Filmmaking

I began this project because of a problem I was facing in my own workflow on a film production. The Director and I needed to find out where to position the actors for a scene. We took turns standing in as the characters and shooting example clips. But this was taking too long and we couldn't fully capture the vision of the scene. We didn’t have enough time or resources to draw storyboards which would have been essential for our shoot. In the world of indie filmmaking, time and budgets are extremely tight. We knew we needed to accomplish these tasks since we only had a limited amount of time together and couldn't travel back and forth to our location.

With this in mind, I asked myself - How might I improve the storyboarding and planning process?

My Solution

I designed a XR app that allows it’s users to build 3D scenes and rapidly create storyboards that can be shared with an entire team, right from a mobile device.
Create a 3D scene complete with characters, objects, and intuitive UI so filmmakers can build their storyboard scenes quickly.
Use AR to rapidly iterate and communicate character placement and framing for the film planning process.
See Full Prototype

Competitive Analysis

There are already various methods and tools available to help with the film planning process so I spent some time getting to know their strengths, weaknesses, and what their users thought about them. Along with this, I spent time browsing various forums to form a better understanding of the thought process that filmmakers are going through.

I learned:
Various Netnography findings, including user reviews and forum discussions.

Other Tools Filmmakers Use:

After Effects
Premiere Pro

Identifying User Needs

I interviewed a few filmmakers to better understand how their planning process works. I was curious about any tools, systems, or workflows that they follow.
“Making storyboards is a waste of time.”

Insights

  • The planning approach varies project to project.
  • The process for creating a storyboard needed to be fast.
  • They needed a solution to be easily adjustable.
  • The interface needed to be intuitive, to lessen the learning curve.

Goals for this project

  1. To streamline the storyboarding process.
  2. Make an interface that’s intuitive and gets straight to making a storyboard.
  3. Design a system that makes it easy to share with others

Wireframe Sketches

After this initial round of research, I started to quickly sketch out my ideas. This allowed me to test UI placement and determine how much I would be able to fit on each screen. I only sketched out the main functions I was designing for, adding an object to the scene, customizing the object, and creating a storyboard.

Low Fidelity Prototyping

Creating this low fidelity prototype helped to further understand how to implement each feature into the app. It was also a great way to get it into the hands of users quickly to find their initial reactions.

User Testing #1

After testing with a few users, I realized that I needed to increase the fidelity to convey the ideas of the app. Users were having a hard time imagining the different functionalities and features of adding characters to the scene. So I chose to increase the fidelity and start another round of user testing.
Low Fidelity Prototype.

🚀Hi Fidelity Prototyping

There were a few key features that I needed to test. The main features were of course the 3D character scene and the AR functionality of the app. For the 3D scene, I built a prototype using Figma. I realized that Figma was very limited in it’s capabilities to prototype a 3D app. So I built two prototypes: one that has an annotation walkthrough built in, and another one that is the exact same one but without the annotations. My intention was to get initial impressions without the annotations, to guage the intuitiveness of the app. Then use the annotations to guide the users along a journey and see how they like the functions.
Main prototype for 3D scene building experience.

AR Wizard of Oz Prototype

I planned to use Wizard of Oz prototyping to test the AR functionality. My plan was to have users take photos of the scene, see how they interacted with the camera function, and see how they liked the automatic storyboard creation process. Ultimately, I only ran this test once or twice. I found that the test setup was too confusing for the user and so I opted to use the 3D scene UI and explain a scenario that they would use AR in. The users would then act out their actions on the 3D scene UI. Having this scenario based conversation and asking what they thought specific buttons in the UI would do proved to be the most insightful.

Prototype to test AR functionality.

User Testing 3D and AR

Once I had a higher fidelity prototype, I started another round of testing. This second round consisted of 4-5 testing sessions, with a mix of in person and online. This round revealed more insights about the focus of the project.

Findings

  • Users wanted automations within the app
  • Many users tried zooming using two fingers
  • Users still worried that it would take too long to build a scene
User testing the high fidelity prototype.

Deciding to Pivot

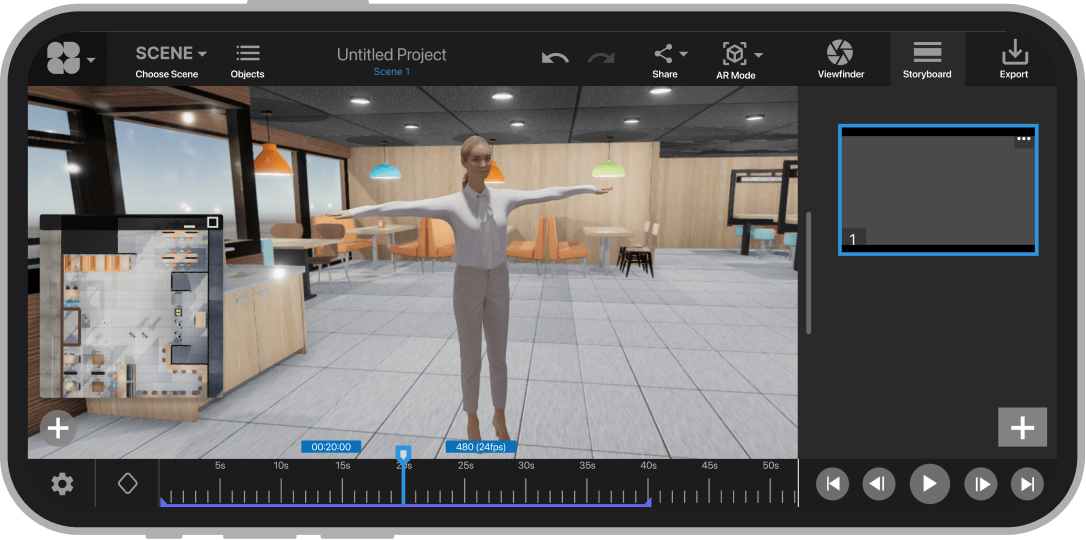
After testing the 3D scene building process and running various scenarios with my user testers, I realized that the users still wanted a faster solution. The fastest solution would be to implement all of the features of this app into an AR experience. All of the functions remain the same, add characters to your scene and take your storyboard shots.

This would allow for faster scene iteration and communication of ideas on set.

Developing an AR MVP

I wanted to take this project further and see if I could build an MVP of the concept. So I turned to the Unity game engine to build this app. The development is a slow process since I’m a beginner with the Unity platform. My focus for this MVP is on the AR functionality, since it allows for the fastest visual communication within your physical environment.

I have successfully implemented one function, with plans to implement more in this order:

  • Adding a character to the scene
  • Add in an object menu
  • Rotate, scale, and delete character function
  • Capture screenshots of scene
Screenshot of the AR MVP concept.
View the first iteration of the AR MVP concept.

Reflection

The next step for this project is to continue to develop the MVP. I've found that prototyping AR projects can be difficult while capturing the full breadth of the experience you want to convey. Every time I found a tool that would allow me to prototype, the business had gone under and the tool was no longer available. Or I simply didn't have the right tech or budget to use a tool. So instead I was finding ways to break down sections of the app to test, and did a lot of scenario based interviews. But, I'm thinking that the MVP will allow me to gather even more insights. I've also really enjoyed taking this project from concept to development. I have plans to eventually ship a version of this app, which I'm even more excited for.

If I were to do anything differently, I would have taken the UI of my design and overlayed it onto a basic AR scene template in Unity. By doing this I could have had a very simple, but working AR app that I can show my users. They would still need to use their imagination but it would have allowed me to introduce the AR functionality more effectively to my users, and it could have unleashed more insights into how they expect the AR experience to function. Overall, I think I was still able to gather valuable insights using my Figma prototype and user interviews. But I'm even more excited to get the MVP in the hands of users, so that I can start iterating again. All in all, this project was a massive success and has really opened my eyes to the build/design process with AR.